Displacement Sensors
PLC
- Wafer orientation measurement
- Checking amount of adhesive applied
- Measuring position of protruding part of building material
- Checking evenness of grinding stone
- Measuring thickness of plaster board
- Detecting joints of thin metal plates
- Measuring thickness of aluminum plate
- Finding edge position of thin metal plate role
- Measuring angle of iron plate
- Measuring position of welded pipe for a tank
- Measuring length of metal bar for cutting machine
- Measuring height of the parts assembled
- Checking type of the parts for automotive by measuring size
- Checking if the robot arm is holding object correctly or not
- High speed profile controlling of glass substrate
- Controlling height of exposure head
- Measuring height of PWB
- Measuring thickness of PWB while it's polished
- Detecting chipped part of glass plate
- Measurement thickness of glass substrate and height of exposure mask
- Thickness measurement of glass plate for FPD
- Detecting overlapping of glass plates
- Dimensions inspection of assembled PV plate
- Measurement of warpage of metal frame
- Measurement of wafer thickness
Wafer orientation measurement
![]()
CD33-L30 laser displacement sensors can be used to measure the orientation of a wafer on a robot arm.
Because they are specular reflection type sensors, CD33-L30 sensors enable accurate orientation measurement even with specular objects like wafers.
In addition, using the UQ1-02 as a controller allows the sensors to be easily connected to Mitsubishi Electric MELSEC-Q series modules. Moreover, using the dedicated UQ1 Navigator setup software makes it possible for anyone to easily set up calculation settings when using multiple sensors.
Model: Compact Low Cost Displacement Sensor CD33-L30
Checking amount of adhesive applied
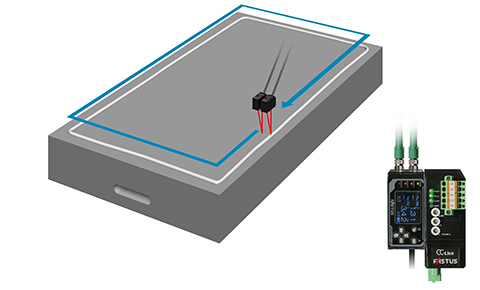
Monitoring amount of adhesive applied by measuring height difference between peak height of the adhesive and height of the workpiece surface using laser displacement sensor CD22.
By connecting the controller CDA series and CC-Link communication unit UC1 series, CD22 series can be connected to PLC through CC-Link.
Calculation using measurement results from two sensors is also possible easily and quickly by CDA series.
Model: Small mall laser displacement sensor CD22+CDA+UC1
Measuring position of protruding part of building material
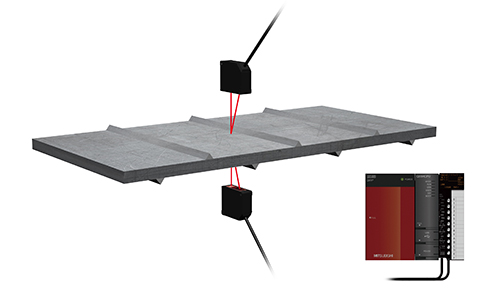
Measuring position of protruding part of building material by two CD33 sensors.
By utilizing control unit UQ1 series, you can connect two CD33 sensors to Mitsubishi MELSEC-Q series. Setup can be done automatically without any ladder programs and also you can get measurement result from PLC CPU easily. An application program "UQ1 Navigator" for setup is available for free of charge.
Model: C-MOS laser displacement sensor CD33 Series + UQ1-02
Checking evenness of grinding stone
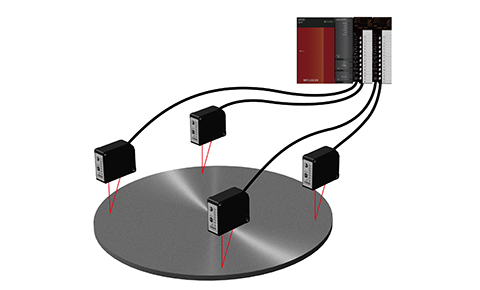
Checking evenness of grinding stone by multiple CD33 series.
You can connect multiple CD33 sensors to Mitsubishi MELSEC-Q series through control unit UQ1-02 (two CD33 to one UQ1-02) without any ladder programs and setup so installation will be done in short time.
Model: Displacement sensor control unit UQ1-02
Measuring thickness of plaster board
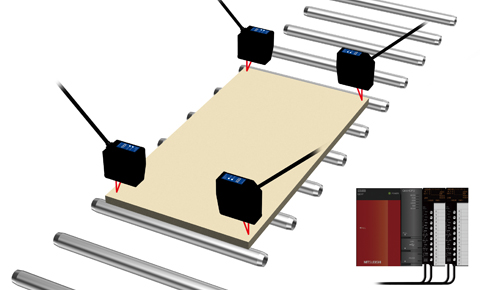
Measuring thickness of plaster board by CD5 series.
By utilizing control unit UQ1-01, you can connect multiple CD5 sensor heads to Mitsubishi MELSEC-Q series without CD5 amplifier and any ladder programs. Then, you can measure not only thickness of the plaster board but also evenness by measurement results from multiple sensor heads.
Model: Displacement sensor control unit UQ1-01
Detecting joints of thin metal plates
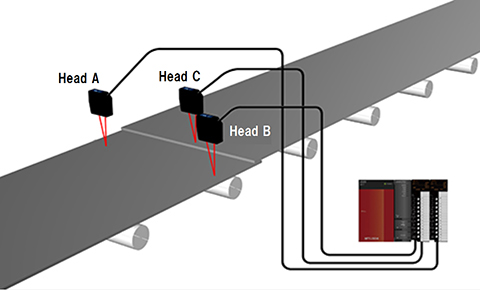
Detecting joints of thin metal plates by multiple CD5 sensors.
By detecting height difference between metal plates by 3 CD5-W150 sensor heads connected to Mitsubishi MELSEC-Q series through control unit UQ1-01 without amplifier for CD5 series and any ladder programs, you can get calculated result directly from MELSEC-Q series and detect the joints of the metal plates easily.
Model: High accuracy laser displacement sensor CD5-W150
Measuring thickness of aluminum plate
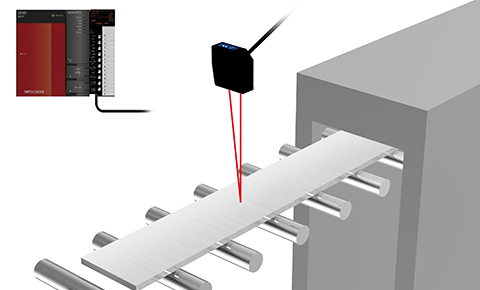
Measuring thickness of the aluminum plate by CD5 series.
You can get measuring result at up to 260k points continuously by installing control unit UQ1 without ladder programs. CSV file is available from the UQ1 series through Mitsubishi MELSEC-Q series.
Model: High accuracy laser displacement sensor CD5-W500
Finding edge position of thin metal plate role
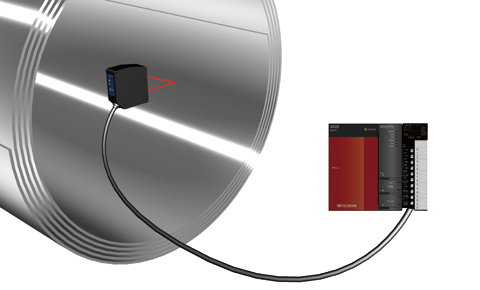
Finding edge position of the thin metal plate role by CD5-85 for positioning of the label.
It can measure in 1μm repeat accuracy so finding very thin level difference. By utilizing control unit UQ1 series, you can connect CD5 sensor heads to Mitsubishi MELSEC-Q series without ladder programs. Then, you can get measurement result very easily using an application software provided for free of charge.
Model: Displacement sensor control unit UQ1-01
Measuring angle of iron plate
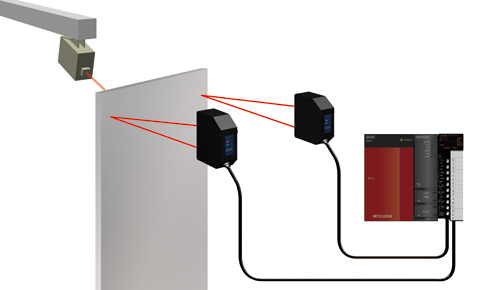
Measuring angle of iron plate by CD5-W2000.
Its sensing distance is 2000 +/- 500 mm so it can measure distance and calculate angle of the iron plate even if the plate is high temperature.
You can also connect CD5 sensor heads to Mitsubishi MELSEC-Q series using control unit UQ1 series without CD5 amplifier and ladder programs. Then, you can get measurement result and calculation result very easily. In this case, PLC CPU won't have to work for the measurement and calculation.
Model: Displacement sensor control unit UQ1-01
Measuring position of welded pipe for a tank
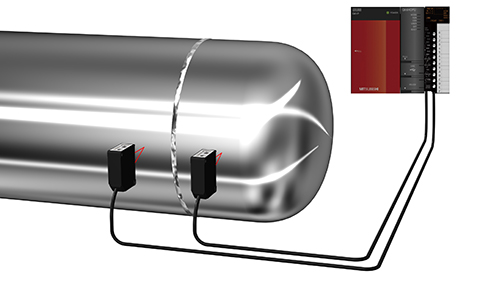
Measuring position of welded pipe for a tank by 2 CD33 series sensors.
Multiple CD33 sensors can be connected to Mitsubishi MELSEC-Q series through control unit UQ1-02. You don't have to have ladder program for setup and measurement. A free software is ready for setup and measurement.
Model: C-MOS laser displacement sensor CD33 Series + UQ1-02
Measuring length of metal bar for cutting machine
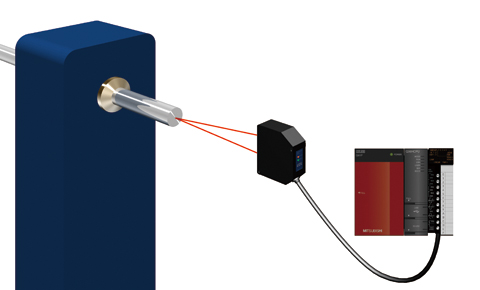
Measuring length of metal bar for cutting machine by CD5 series.
CD5-W2000 has 2000mm +/- 500mm measurement range so it can cover long range. You can connect the sensor to Mitsubishi MELSEC-Q series through control unit UQ1-01 without amplifier and ladder programs which helps easy installation and reducing cost of the measurement system.
Model: Displacement sensor control unit UQ1-01
Measuring height of the parts assembled
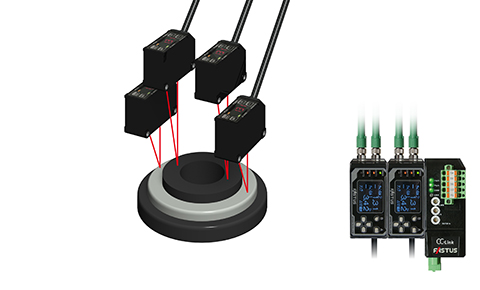
Measuring height of the parts assembled by multiple CD22.
You can measure level deviation of the parts assembled by multiple CD22 sensors and utilizing measurement results from them.
Since CD22 is small sensor, you can install narrow space. You can also utilize displacement sensor control unit CDA to calculate level difference easily.
Communication unit UC1 will help connecting those sensors to Mitsubishi PLC very easily utilizing iQSS compatible functions (getting measurement result, setup read/write, backup, etc.).
Model: Small laser displacement sensor CD22 Series + CDA + UC1
Checking type of the parts for automotive by measuring size
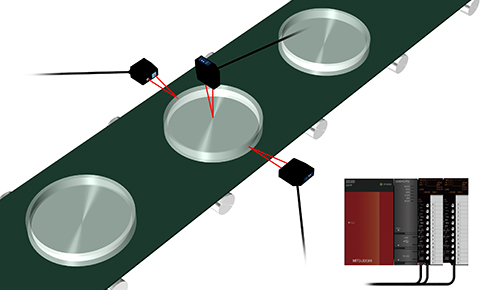
Checking type of the parts for automotive by measuring size by CD5 series.
By utilizing displacement control unit UQ1 series, you can connect multiple sensor heads to Mitsubishi MELSEC-Q series without any ladder programs in short time. You can also get measurement result and calculation result at one time.
Model: High accuracy displacement sensor CD5 Series
Checking if the robot arm is holding object correctly or not
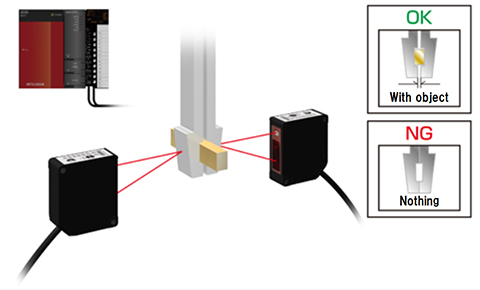
Checking if the robot arm is holding the object correctly or not by CD33.
By using two CD33, you can measure the size of the robot arm and can check if the robot arm is holding object or not. You can also connect the sensor to Mitsubishi MELSEC-Q series through control unit UQ1-02 without any ladder programs in short time.
Model: Displacement sensor control unit UQ1-02
High speed profile controlling of glass substrate
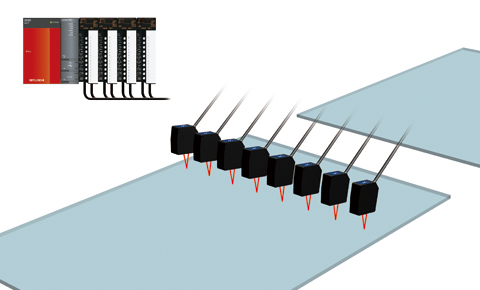
High speed profile controlling of glass substrate by CD5 series and control unit UQ1.
You can store measurement result data every 10msec. CD5 sensor heads can be connected to Mitsubishi MELSEC-Q series through control unit UQ1-01 without ladder programs easily. It has storage function and loading can be done easily through CPU unit of MELSEC-Q series.
Model: Displacement sensor control unit UQ1-01
Controlling height of exposure head
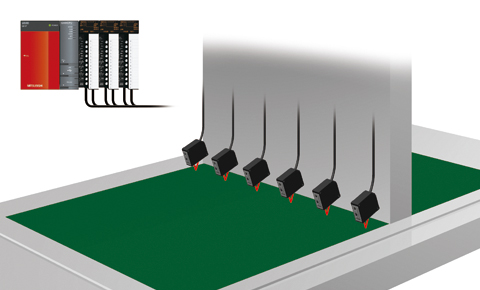
Controlling height of exposure head by measuring z axis alignment of the head utilizing CD33 series.
It is compact and light weight displacement sensor so you can mount it on the exposure head. You can also connect the sensors to Mitsubishi MELSEC-Q series through control unit UQ1-02 without ladder programs.
Model: Displacement sensor control unit UQ1-02
Measuring height of PWB
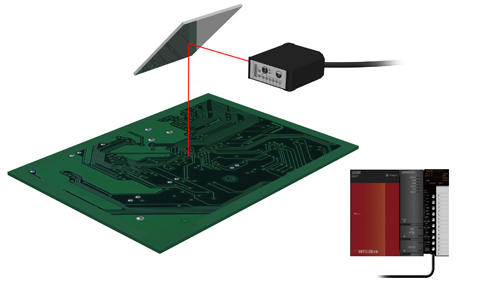
Measuring height of the PWB by CD33.
When there is no space above the PWB, you can utilize a mirror that changes the direction of the laser beam 90 degree and install the sensor at the narrow space.
By utilizing displacement sensor control unit UQ1 series, you can connect CD33 to Mitsubishi MELSEC-Q series without any ladder programs and setup can be done automatically.
Model: Displacement sensor control unit UQ1-02
Measuring thickness of PWB while it's polished
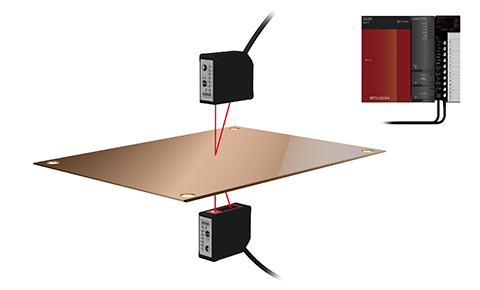
Measuring thickness of PWB while it's polished by CD33.
It measure the thickness and feedback to the polishing machine to control the thickness.
You can connect two CD33 to Mitsubishi MELSEC-Q series through displacement sensor control unit UQ1-02 without any ladder programs in short period. Then, you can get calculated result through UQ1-02 very easily.
Model: Displacement sensor control unit UQ1-02
Detecting chipped part of glass plate
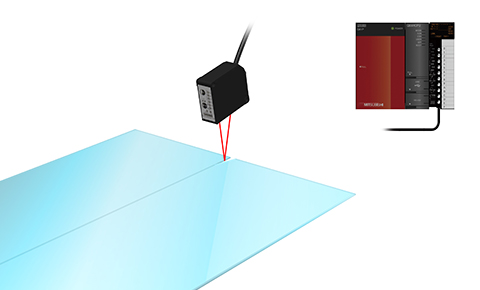
Detecting chipped part of glass plate for FPD by specular laser displacement sensor CD33-L85.
By utilizing control unit UQ1-02, connecting to Mitsubishi MELSEC-Q series and setup can be done automatically. Setup software "UQ1 Navigator" is ready for easy setup for this application.
Model: C-MOS laser displacement sensor CD33-L85 + UQ1-02
Measurement thickness of glass substrate and height of exposure mask
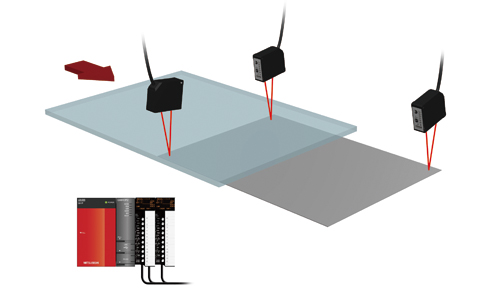
By using specular type C-MOS displacement sensor CD33-L30, measurement of glass thickness and height of exposure mask can be done at one time.
Specular type displacement sensor can measure thickness of high transparency glass plate so height of exposure mask and glass thickness can be measured from one direction which can reduce number of sensor heads.
By utilizing control unit UQ1 and its software "UQ1 Navigator", setup can be done very easily in short time.
Model: Displacement sensor control unit UQ1 Series
Thickness measurement of glass plate for FPD
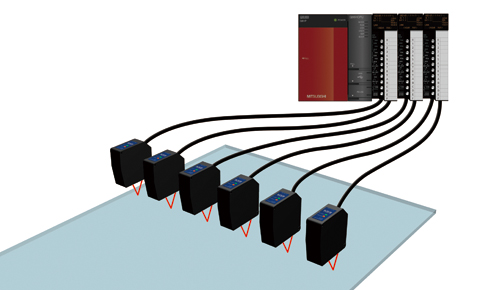
Thickness measurement of glass plate for FPD can be done by multiple CD5-L25. It measures thickness of the glass plate by detecting two reflected light from 1st surface and 2nd surface of the glass.
By using displacement sensor control unit UQ1 series, you can connect sensor heads to Mitsubishi MELSEC-Q series without any setting and any ladder programs. UQ1 has original communication interface "FIrST" with other UQ1 series so you can get calculated result using multiple measurement results from sensor heads.
Model: Displacement sensor control unit UQ1-01
Detecting overlapping of glass plates
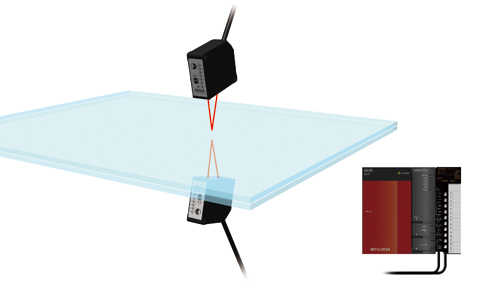
When two glass plates were loaded to next stage, the plates may be broken so detecting overlapping of glass plates is very important.
By two laser displacement sensor CD33-L30N*, measurement of thickness of the glass plate is possible. Also, those sensors can be connected to Mitsubishi MELSEC-Q series through control unit UQ1-02 easily without ladder programs. Calculation can be possible by the controller.
Model: Displacement sensor control unit UQ1-02
Dimensions inspection of assembled PV plate
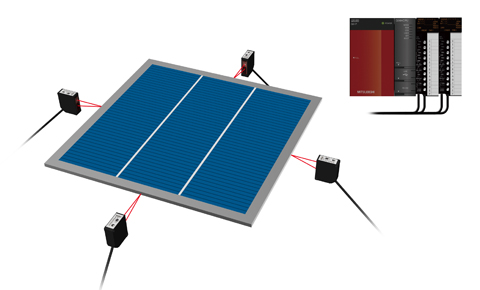
Dimensions inspection of assembled PV plate by laser displacement sensor CD33-85N*.
Its repeat accuracy is 10um at measurement distance 85mm. By connecting those sensors to Mitsubishi MELSEC-Q series through control unit UQ1-02, you can get measurement result very easily without setup and ladder programs in short time.
Model: Displacement sensor control unit UQ1-02
Measurement of warpage of metal frame
![]()
Measurement of warpage of the semiconductor frame in the vacuum chamber by CD5-W500. Measurement range of CD5-W500 is 500+/-200mm so it can measure warpage from long distance, outside of the chamber through the view port. By utilizing control unit UQ1-01, connection to Mitsubishi MELSEC-Q series will be very easy and calculation using multiple sensor heads can be set in short time.
Model: High performance displacement sensor CD5-W500
Measurement of wafer thickness
![]()
Measurement of thickness of semiconductor wafer by laser displacement sensor CD5-L25.
By utilizing control unit UQ1-01, the sensor can be connected to Mitsubishi MELSEC-Q series without CD5 amplifier. It doesn't need ladder programs so the installation will be completed in short time.
Model: High accuracy displacement sensor CD5-L25
Application examples
by industry
- Semicon
- FPD/PV
- Electric
- Electronics Components
- Automotive
- Machinery
- Rubber/Plastic
- Metal
- Steel
- Logistics
- Foods
- Beverage
- Printing
- Others


